7MM VALKYRIE AR
  • Home
  • About
  • Performance
  • Hardware
  • Reloading
    • Load data
  • How to order
  • Photo & Video Gallery
  • Blog
  • Contact & Links

Forming 7Var brass from 7.62 updated procedure

1/27/2016

2 Comments

 
Picture

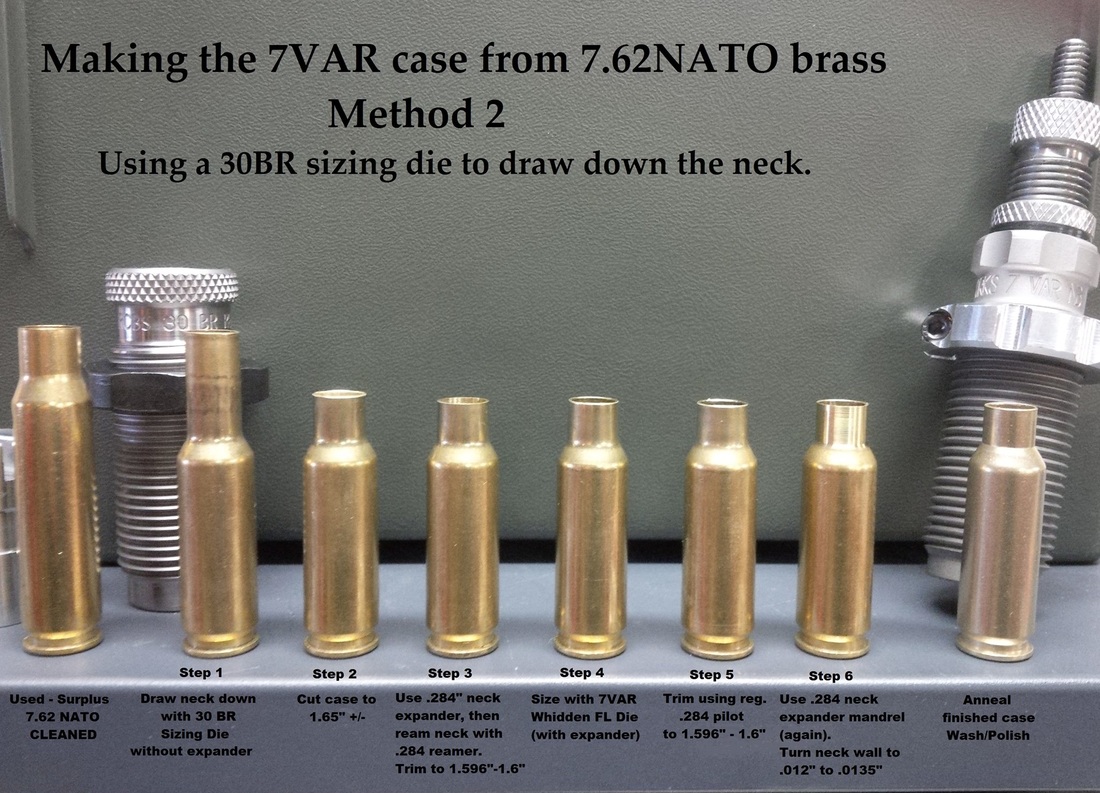
Method 2 by Keith Barker:

Update in reference to making 7VAR brass from 7.62NATO cases using a 30BR die to draw the cases down.
I finally got a chance to make a lot of 7VAR using the 30BR sizing die to draw the neck down, and I can tell you that this works real nice.

This is my process:
1. mount the 30BR die (I'm using RCBS) off the top of the shell plate around .200" or so and draw down the 7.62 case. Note: no annealing first now seams to work better.

2. Cut to length with chop saw and deburr.

3. Expand case mouth with .284 expander mandrel (I'm using the 21st Century Mandrel).

4. Ream with .284 reamer and trim to desired case length.

5. Size with 7VAR Whidden die w/expander inserted.

6. Expand again with .284 expander mandrel if using the 21st Century Lathe for neck turning.

7. Trim again with smooth trimming pilot.

8. Neck turn.

9. Anneal, wash/polish.

Notes: I noticed much less neck tension while neck turning, making the process a bit smoother.
2 Comments

Home built cerekote oven

1/19/2016

2 Comments

 
Picture
Picture
I decided to make my own curing oven for Cerekote. I wanted something large enough to cure up to 30 inch barrel and have room to cure all parts going on an AR-15.  

I was going to build the cabinet myself but after some research and looking for steel I decided I would be money and time ahead to just find a cabinet that would work. Here is a parts list of what I used to build my oven.


PID controller with thermocouple and ssr   

Electric oven element    

Contactor 

Stack-On® 21" Buck Commander Bow and Gear Storage Cabinet   


1- 4x8 sheet of 5/8 drywall  I needed more to do door but at this point it is working fine without it on the door.

Duct insulation 

Electrical junction box  

15 amp standard light switch

220 oven/drier cord 

Shelf hangers   

Misc bolts and hardware.

I started out taking all the stuff out of the cabinet. I located where I was going to put the element. I cut the hole in the cabinet for the element to protrude. 

​
Once that was done I installed the drywall. I used 1/4" carriage bolts and fender washers to hold it in. I then lined it with the duct insulation by stapling it to the drywall.I taped the seems with aluminum tape also taping the inside of the door.  ​


I then mounted the element and box and installed the shelf bracket rails. Now it is all done on the inside and ready to wire


 The wiring is the tricky part. For me I got mine done and wired and it didn't work. I needed 110v to power the pid and contactor and made an assumption that was wrong. so with my design I had to run a 110v power and 220 to my box to get it to work.
After the first run I rechecked why my first wire diagram didn't work and found out when I wired my breaker box in the garage I forgot to tie both ground rails together so when I used the center wire for my common wire it wasn't connected to the common rail. I rewired my breaker box correctly by installing the jumper wire from rail to rail and then wired it as I had the first time and now it works fine and I don't need the extra 110 cord to power the box
here is my box and here is a couple of different wire diagrams to give an idea how to wire. 
​


Over all it turned out well and it works that is the important thing. couple of things to watch for: when buying your pid make sure it is a F deg. and not Celsius if you don't want to make a conversion chart like I had to do.Make sure to get aluminum foil tape not just reflective duct tape.
​
Picture
2 Comments

"7VAR Smokes the 50 Beowolf"!

1/8/2016

1 Comment

 
This week just a little fun post.

One of the Valkyrie end users sent me this. He loves his Valkyrie. Someone was bragging about the 50 Beowolf so he ran the numbers. this is with an 18 inch valkyrie the spanking is worse with a 22 or 24 seeing they get 150 fps or more better velocity.

Don't get me wrong the big bores are fun to shoot just don't make them out to be more than what they are 150-200 yard fun guns

Picture
24 inch barrel
Picture
Picture
Picture
Picture
1 Comment

    Author
    multiple 

    This blog will be a collection submitted by 7VAR Founders, Testers and End users

    Archives

    December 2017
    November 2017
    January 2016
    December 2015
    November 2015
    October 2015
    August 2015
    July 2015
    June 2015
    May 2015

    Categories

    All

    RSS Feed

Proudly powered by Weebly