
Today I will be talking about how to set up your die to size your wildcat rounds or any round for that matter. I will be discussing the tools that make it easier to do the job and some of the terminology.
First let’s start off with what is meant by shoulder bump? Shoulder bump is the amount – distance you push the shoulder back when sizing so it fits the chamber. You want as little bump as you can get away with for accuracy and brass life but enough so the rounds chamber reliably. Semi-auto rifles take a little more bump than bolt guns do. In bolt guns if brass is only fired in one gun you need very little as in < .001 bump. But autoloaders take normally .002-.004 shoulder bump or set back as it is called sometimes.
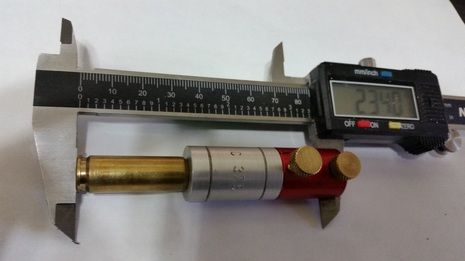
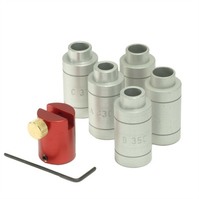
Tools needed Micrometer of some sort digital or analog, Head space adapter set like the Hornady head space kit HK66 http://www.midwayusa.com/product/479704/hornady-lock-n-load-headspace-gage-5-bushing-set-with-comparator
You pick the correct comparator body for the round you are measuring it should come close to the center portion of the shoulder.
Wildcats differ because there are no SAAMI or generally accepted published specifications for the round, so to get the proper shoulder bump you first need to see how far your newly formed brass has to have the shoulder set back to chamber in your particular rifle.
To get started, take your new brass and form it in your die initially with the die screwed all the way to the shell holder and then backed off ½ turn off shell holder Run the case through the die and measure the shoulder position. You accomplish this by using the Hornady headspace kit which attaches to your calipers in order to take a measurement.
Some wildcats come with a starting spec for the shoulder. If not, finish all the other prep work required for that piece of brass and try to chamber it. If the bolt won’t close or it sticks in the chamber you need to adjust your die down a bit and resize. I would do this in 1/16th turn increments until it chambers reliably without fail.
Next, measure the shoulder position again and back the die off 1/16th turn. Size a new case and try to chamber it. If needed, adjust the die down slightly until it does and form a new case again to test. If this round chambers reliably and without effort or sticking, measure the shoulder position. With this done you have established your new brass shoulder position or your baseline.
Now make up some cases and make sure they chamber. Load them with a safe starting load, obviously nothing near maximum, and fire them. Some low-powered starting loads may not fully shape your new cases to the chamber, so at this stage I usually run a “pressure ladder” where I have prepared progressively hotter charges in .3 grain increments up to where max should be for the bullet and powder being used.
When firing this test ladder, I watch for pressure signs on the case head, neck (for sealing), and primer. Obviously you will stop working up the ladder if you start to see signs of maximum pressure. I usually do 7 to 10 round ladders loading one round of each charge.
When done I measure and record all of the shoulder positions. What you will see is where they quit growing, and that will be your fire-formed shoulder position. Important: Save that in your notes.
Now you are ready to resize the brass. Once again back off the die a quarter turn, resize, measure the shoulder, and then run through the die again until you have the shoulder bump that you want. You are looking for .002 or less vs. what you recorded for the fired round. Adjust die down until you get that. Once you have it, try and test chamber your sized brass also checking for smooth extraction. If it isn’t smooth go back and bump the shoulder back another .001 and repeat this until your resized brass chambers and extracts perfectly.
As I stated above, normally with auto loaders .003 is what I’m looking for, but some rifles with tight chambers will take .004 or .005.
Something to bear in mind since we’re not necessarily running the die all the way down onto the ram in your press is that you may or may not be caming over on the press when you get the correct shoulder bump. This is normal if so.
Also, the type of lube you use and how much is on the case will affect the shoulder bump, so consistent and good practices there are important. I only use enough lube to keep the cases from sticking and try to keep it off the shoulder area.
First let’s start off with what is meant by shoulder bump? Shoulder bump is the amount – distance you push the shoulder back when sizing so it fits the chamber. You want as little bump as you can get away with for accuracy and brass life but enough so the rounds chamber reliably. Semi-auto rifles take a little more bump than bolt guns do. In bolt guns if brass is only fired in one gun you need very little as in < .001 bump. But autoloaders take normally .002-.004 shoulder bump or set back as it is called sometimes.
Tools needed Micrometer of some sort digital or analog, Head space adapter set like the Hornady head space kit HK66 http://www.midwayusa.com/product/479704/hornady-lock-n-load-headspace-gage-5-bushing-set-with-comparator
You pick the correct comparator body for the round you are measuring it should come close to the center portion of the shoulder.
Wildcats differ because there are no SAAMI or generally accepted published specifications for the round, so to get the proper shoulder bump you first need to see how far your newly formed brass has to have the shoulder set back to chamber in your particular rifle.
To get started, take your new brass and form it in your die initially with the die screwed all the way to the shell holder and then backed off ½ turn off shell holder Run the case through the die and measure the shoulder position. You accomplish this by using the Hornady headspace kit which attaches to your calipers in order to take a measurement.
Some wildcats come with a starting spec for the shoulder. If not, finish all the other prep work required for that piece of brass and try to chamber it. If the bolt won’t close or it sticks in the chamber you need to adjust your die down a bit and resize. I would do this in 1/16th turn increments until it chambers reliably without fail.
Next, measure the shoulder position again and back the die off 1/16th turn. Size a new case and try to chamber it. If needed, adjust the die down slightly until it does and form a new case again to test. If this round chambers reliably and without effort or sticking, measure the shoulder position. With this done you have established your new brass shoulder position or your baseline.
Now make up some cases and make sure they chamber. Load them with a safe starting load, obviously nothing near maximum, and fire them. Some low-powered starting loads may not fully shape your new cases to the chamber, so at this stage I usually run a “pressure ladder” where I have prepared progressively hotter charges in .3 grain increments up to where max should be for the bullet and powder being used.
When firing this test ladder, I watch for pressure signs on the case head, neck (for sealing), and primer. Obviously you will stop working up the ladder if you start to see signs of maximum pressure. I usually do 7 to 10 round ladders loading one round of each charge.
When done I measure and record all of the shoulder positions. What you will see is where they quit growing, and that will be your fire-formed shoulder position. Important: Save that in your notes.
Now you are ready to resize the brass. Once again back off the die a quarter turn, resize, measure the shoulder, and then run through the die again until you have the shoulder bump that you want. You are looking for .002 or less vs. what you recorded for the fired round. Adjust die down until you get that. Once you have it, try and test chamber your sized brass also checking for smooth extraction. If it isn’t smooth go back and bump the shoulder back another .001 and repeat this until your resized brass chambers and extracts perfectly.
As I stated above, normally with auto loaders .003 is what I’m looking for, but some rifles with tight chambers will take .004 or .005.
Something to bear in mind since we’re not necessarily running the die all the way down onto the ram in your press is that you may or may not be caming over on the press when you get the correct shoulder bump. This is normal if so.
Also, the type of lube you use and how much is on the case will affect the shoulder bump, so consistent and good practices there are important. I only use enough lube to keep the cases from sticking and try to keep it off the shoulder area.
 RSS Feed