7MM VALKYRIE AR
  • Home
  • About
  • Performance
  • Hardware
  • Reloading
    • Load data
  • How to order
  • Photo & Video Gallery
  • Blog
  • Contact & Links

Next up for my wildcats the .22 HELLCAT

12/30/2015

8 Comments

 
Picture
Picture
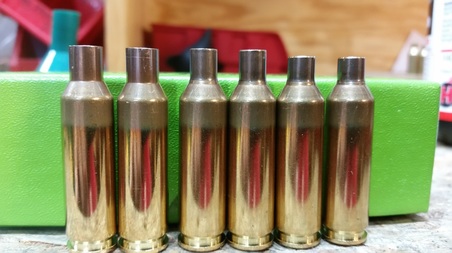
This week thought I would talk about what i am working on now. I just got in the first barrels of my latest wildcat round I designed the 22 Hellcat. The Hellcat came about when a couple of us got to talking and really wanted a 22-250 in an AR. I wanted to do a simple cat for once that didn't require a lot of brass work so I started messing with cases and numbers.

 After running some numbers and making a few dummy rounds to see how bullets fit in the case I ran my conclusions by the guys. After a bunch of discussion I pooled the ideas and came up with the Hellcat. No the Hellcat isn't really all new in basic form it has been done in the 22x47 lapua but the case was too long to fit in the AR magazine so I decided to trim the case to 1.8 inches and make the round for light bullets only. So if you can find 22x47 lapua dies they will work for this cat.

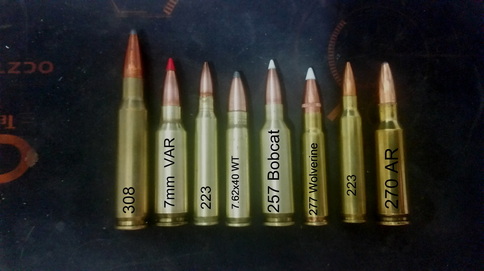
The Hellcat is a 6.5x47 lapua case necked down to .224 and then trim the case to 1.8 inches that is it. just neck down and trim. Shoulder position is in the same place as the 6.5x47 no neck turn or ream. That makes this a very simple wildcat that anyone can enjoy. It is maxing out the case and AR magazine but it will fit 65 grain sierra bullets on down.

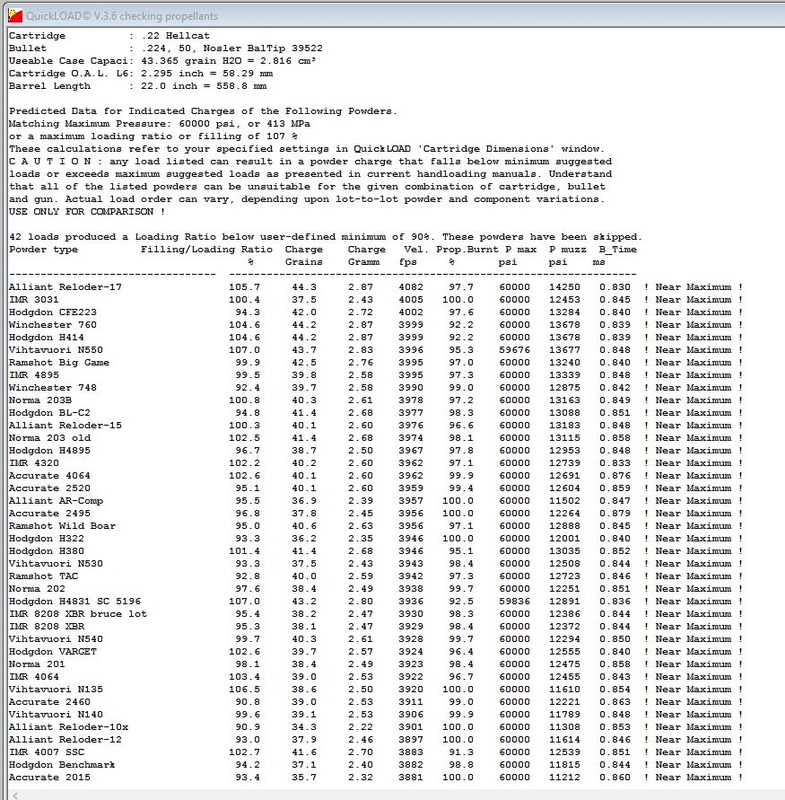
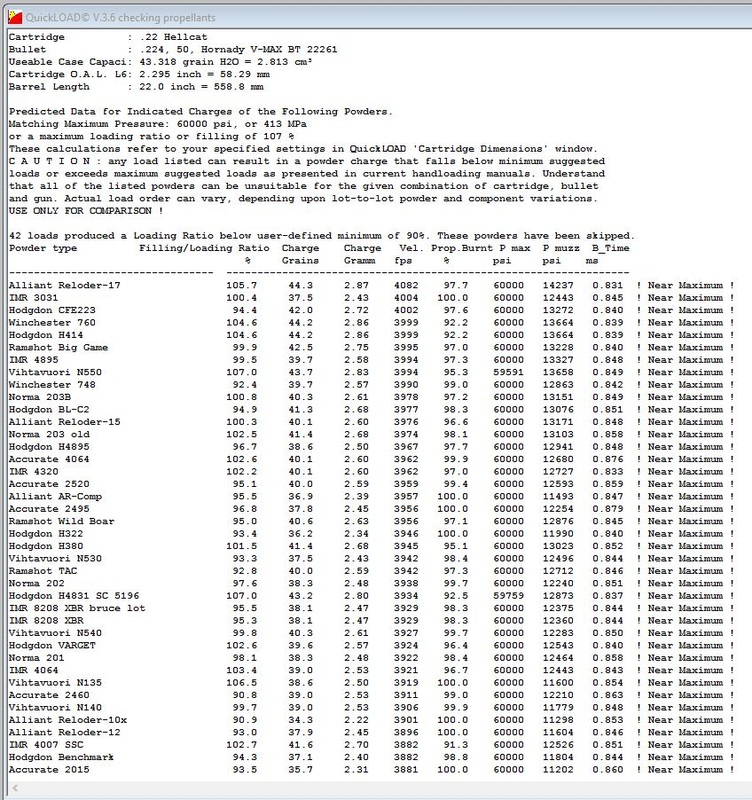
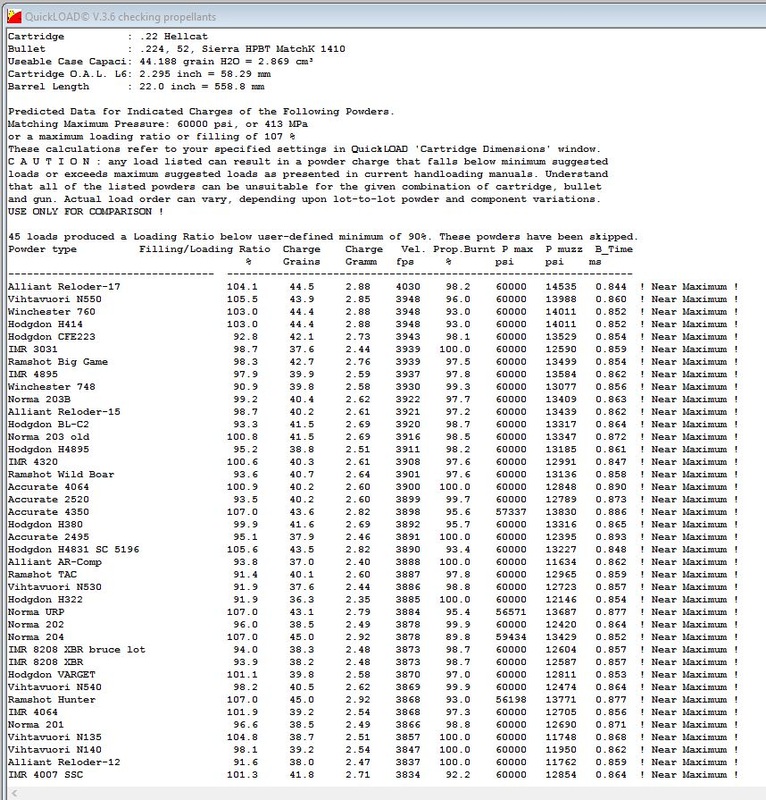
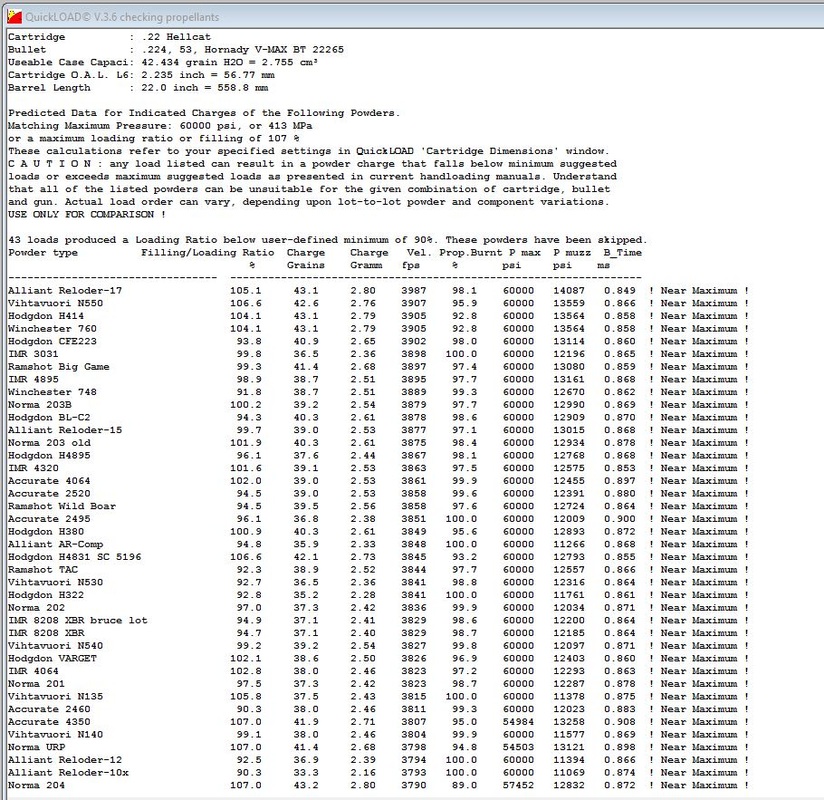
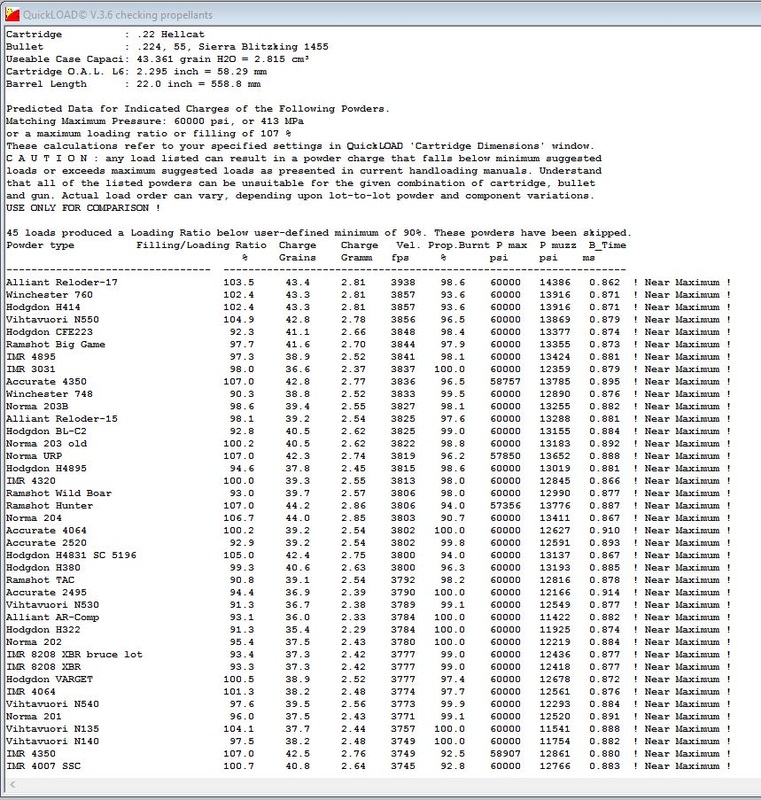
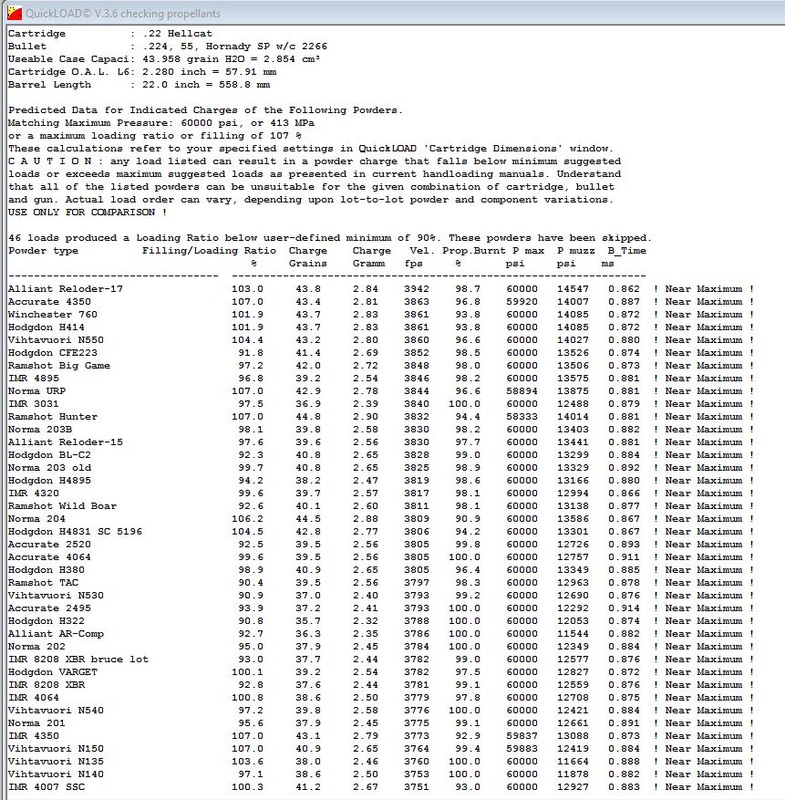
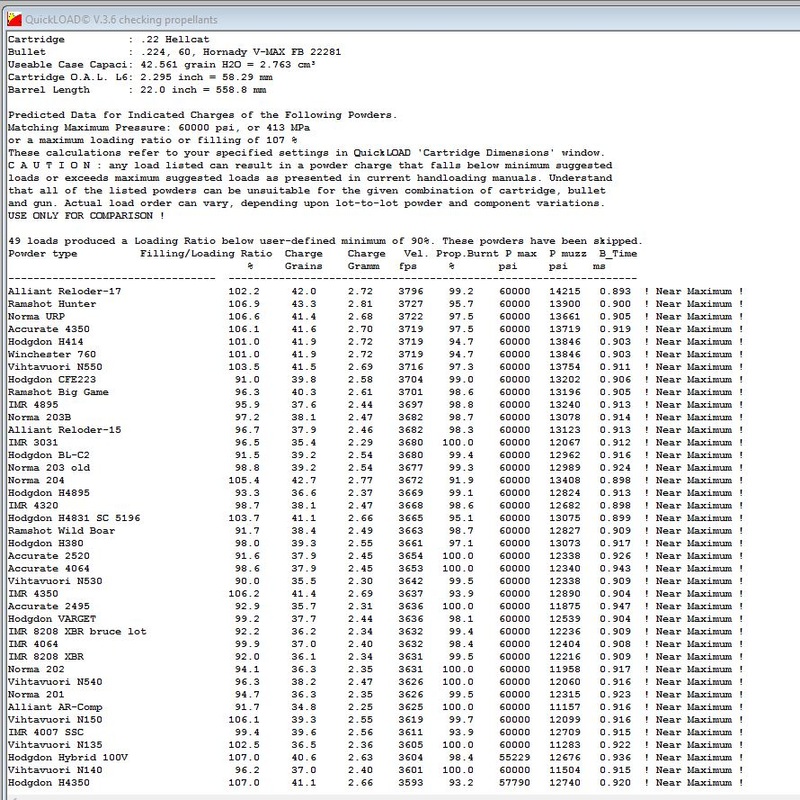
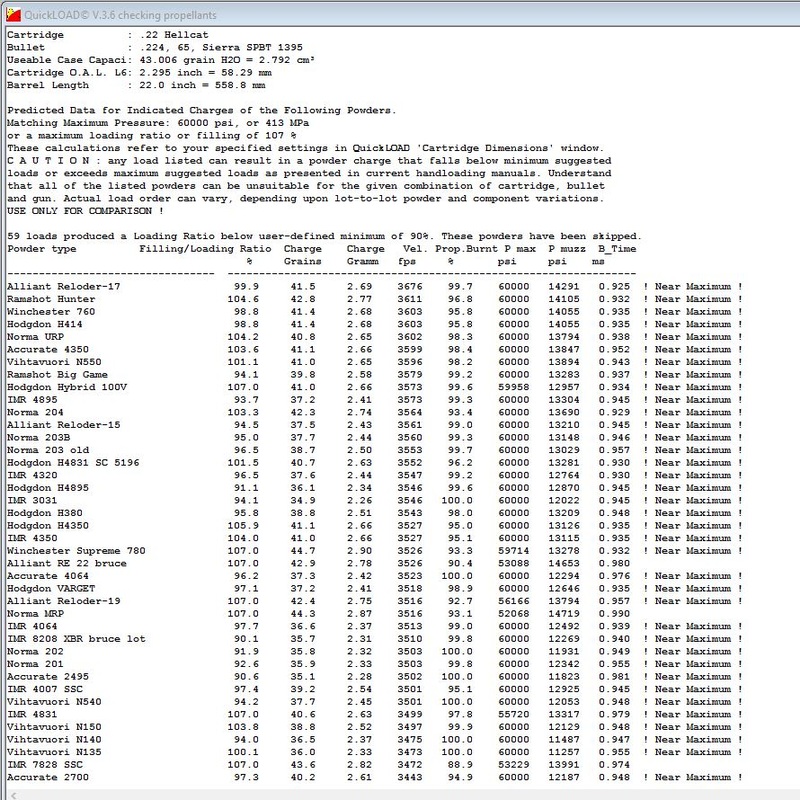
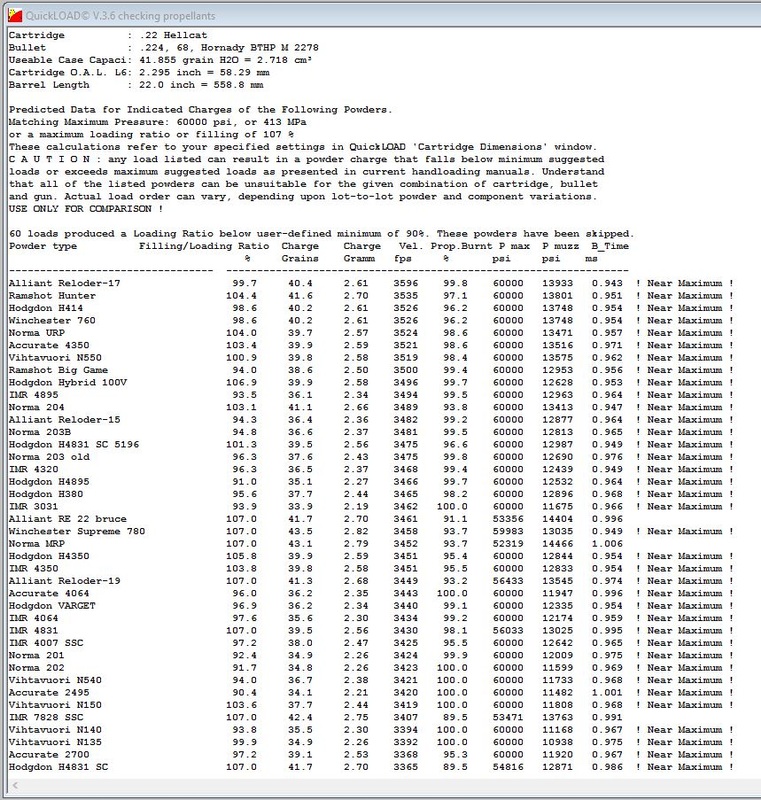
Performance estimates put it just ahead of the 22-250 but i will be happy with 22-250 performance. Case capacity is 46.3 grains on fresh formed brass which puts it about 2 grains more than most 22-250's

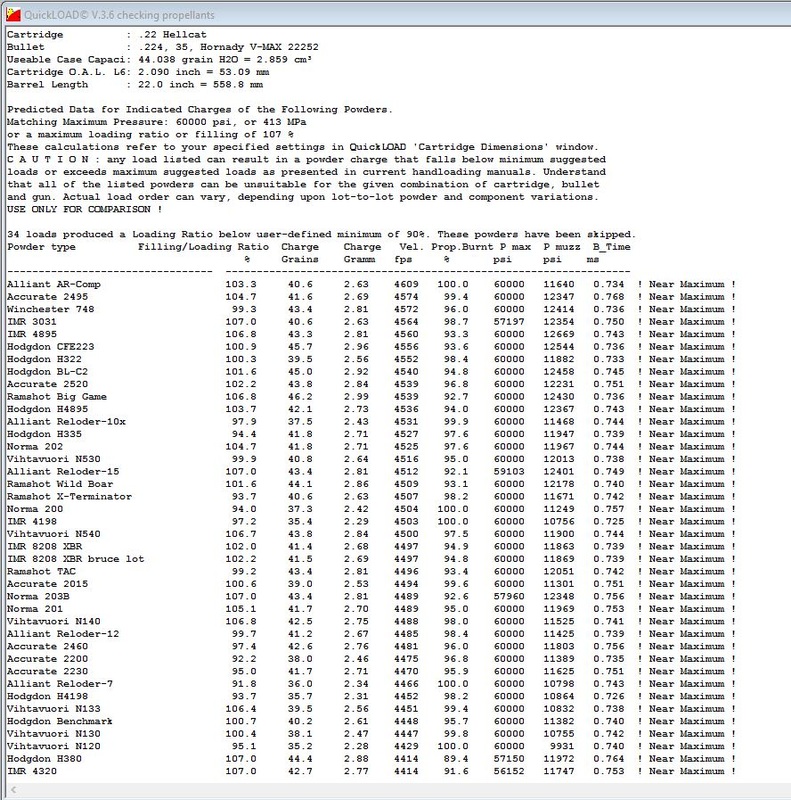
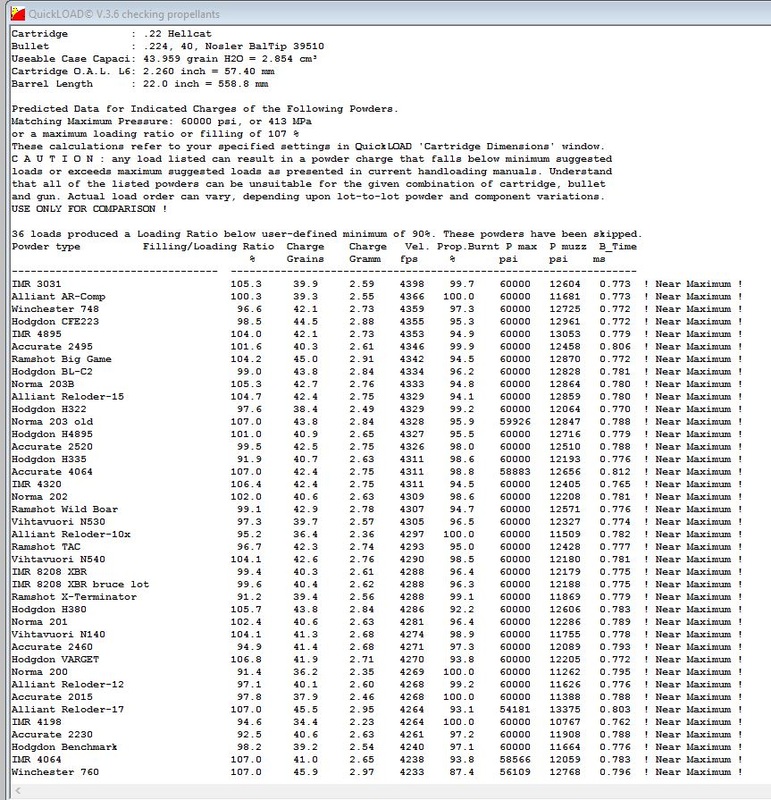
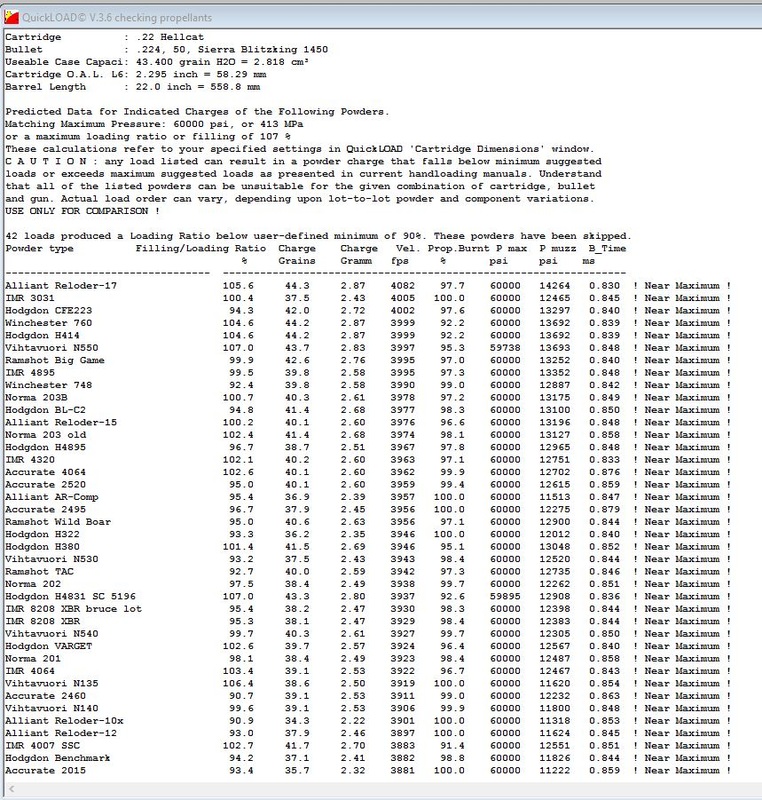
Below are the performance estimates for a 22 inch barrel.

 In the first batch of barrels we have 6 22 inch and 1 20 inch with half 10 twist and half 12 twist.  If staying 55 grain and under the 12 twist is just fine I wanted to test the 65's so I got a 10 twist.

 With the overbore status of this round I don't expect great barrel life. It should be on par with the 22-250 but the flat out performance for the AR15 on varmints will be worth it. 
8 Comments

Developing Load Data for Wildcats: Starting from Ground Zero

11/30/2015

8 Comments

 
Picture
By John Hull
​
Developing Load Data for Wildcats:

 
Starting from Ground Zero
 
 
Once you have a data set to work with, loading a wildcat is no different than loading any other cartridge.  You size cases, prime, drop the charge, and seat a bullet.  Pretty cut and dried.  But what do you do if you don't have any data?  You have to determine what type of powder to use, how much to use, and with what bullet weights.  You have to decide on whether to use standard or magnum primers, and how long the barrel needs to be to get the performance you are aiming for.  If you are new to the reloading game, or have never worked with a wildcat, it can be a very intimidating task.
 
The following is one method that can be used to determine a baseline starting point for just about any wildcat.  It requires using basic math skills including the use of some relatively simple formulas you can get from the web.  You also need to take good notes, and take you time so you don't make silly errors.  You can use software programs like QuickDesign and QuickLoad, but the learning curve for those pieces of software is just a intimidating if not moreso, since you need computer skills to use them right.  You may thus find my method easier, even if a bit more time consuming.
 
First, of course, you need to know the basic dimensions of the case of your wildcat.  Overall length, head to datum line length, case capacity in CC of water (measured to case mouth), inside neck diameter, etc.  If you have a chamber drawing for your cartridge that should have everything on it you need except for the case capacity.  You'll need similar data for the range of bullets you plan on using, as well as basic information on the barrel itself like land and groove diameters, length, etc.
 
To make this work, you need to calculate some things once you get the data mentioned above gathered up.  You will determine case capacity (both to the case mouth and with a nominal bullet weight seated).  You will determine expansion ration based on the case capacity and the barrel length for the caliber in question, and the same for a reference caliber.  You will also use the Sectional Density and Ballistic Coefficient of bullets in the wildcat caliber as well as the reference caliber.
 
To determine case capacity, take a case (newly formed if you have it but fired is OK) and put a spent primer in the primer pocket to seal it from leaking.  If the case has been fired, partially size the neck enough to hold a bullet.  Take a case with the fired primer in place and weight it empty, record the weight.  Fill the case with room temperature water to the case mouth and level it off (no miniscus).  Weigh it again and record that weight.  Subtracting the first empty weight from the filled weight will give you the gross case capacity.  Record that number. 
 
Weigh a bullet, and scribe a deep scratch on the length of it from base to ogive.  Now, take the full case and slowly seat that bullet to a nominal depth such as the cannelure if it has one, or roughly to that point if it doesn't.  Seating pressure will force the excess water out between the bullet and case via the scratch you made.  When it is seated to the right point, weigh the case and record.  Pull the bullet and remove the spent primer.  Subtract the bullet weight from the weight you just recorded.  The result is the capacity of the case in terms of powder space.
 
Next step is to determine barrel volume.  To do this, close the bolt on an empty chamber.  Drop a brass rod or wooden dowel down the barrel until it bottoms out on the bolt face.  Mark the length at the muzzle.  Use you your case diagram to determine the case length from bolt face to case mouth and subtract that from the length you measured for the barrel.  That gives you the actual barrel length from case mouth to muzzle.  Use the formula for the volume of a cylinder to figure the volume of that length of barrel.  I usually add the bore and groove diameters together and divide by 2 to get the average to use for the diameter in the formula.  Record this figure.  To determine expansion ration, you take the case capacity in cc's and divide it by the barrel capacity. You will need this number, so record it.
 
To summarize, we have the following:  case measurements, case capacity (powder and to case mouth), barrel volume, and expansion ration.  The next step is determining our reference caliber.  Here's where you need the sectional density and ballistic coefficient.
 
To do this part right you should have several reloading manuals from different manufacturers.  Most manuals have a section in the front that gives basic data on each bullet from that company.  Things like weight in grains, length, etc.  Start looking sectional density numbers for each bullet.  Make a note of the ones that are the same or closely similar to the bullet you plan to use.  Now compare the coefficient for those you selected, eliminating the ones that aren't close.  What you end up with will have roughly the same coefficient and density, regardless of caliber, so they should all look very much alike (flatbase spitzer, roundnose, boat tail, and so on).  Also, pick cartridges that are as close as possible in size.
 
Now, look at each of your reference candidate cases and the max charges in the tables for each one.  You're going to figure the expansion ration based on the max charge and the barrel length for each caliber just like you did for the wildcat. Try to get a case for each caliber to get an accurate capacity.  If the expansion ratios you get are close to your wildcat, then that cartridge and bullet is a candidate for a reference caliber.  What you'll find when you compare the ballistic tables for each to one another is that they all have roughly the same ballistics, due to similar density, coefficient and expansion ratio.
 
Now, you can go to the loading table for your reference cartridge and look at which powders are being used.  Use the slower powders that are shown, and those same powders will likely work in your wildcat.  Of course, you have to realize a few things at this point.  If you have a barrel of X length and Y caliber, the powder you use will have a certain burning rate based on case capacity, bullet weight, etc.  Use too fast a powder, and you'll hit the pressure ceiling before you get to the optimum load density.  Too slow a powder, and you'll run out of case capacity before reaching that optimum point.  Homer Powley determined decades ago with IMR powders that 80% load density was about the best point for starting loads.  So, if you cartridge has a powder capacity of say, 60 gr., 80% of that would be 48 gr.  Compare that to the load tables.  You'll get a rough estimate of the 80% point with the loads shown.  The powders that meet that criteria in the reference caliber will be suitable for your wildcat.  At this point, you can load up a test ladder and do load workup just like you would with any known cartridge.
 
I have used this method on several wildcats over the years, and it works.  You have to be patient, and make sure you do the math correctly, but it isn't particularly difficult.  I used this for a .375/.338 a number of years ago.  The goal was to reproduce the performance of the .375 H&H in a standard length action (I used a Ruger M77R in .338 Mag as the base).  I not only matched the ballistics of the H&H, but due to the more efficient case design I exceeded them at every level.  The 300 gr. loads beat the best factory loads in that weight by almost two hundred feet per second at the same pressure levels.
 
This method will work for any wildcat.  The key is the research and finding as many suitable reference cartridges as you can.  It gets you where you need to be for starting loads, but it also makes you intimately familiar with your wildcat and how the various relationships all play a role in getting to your goal. 
8 Comments

7mm Valkyrie loading 101

11/25/2015

4 Comments

 
Picture
Now that we have quite a few end users i thought i should go over the reloading procedure for the Valkyrie and really all rifles.

New round loading procedure for already made brass
  1. Prime 
  2. load ladders to find grouping and or max charges/ fire form brass
  3. measure shoulder position on fired cases
  4. measure case water capacity on fired cases
  5. set up sizing die to give .003-.005 shoulder bump - want as little bump as you can and rounds still chamber and extract.
  6. reload normally

Most have bought the kits that came with brass so the first firing you load your ladders work up and find your loads. Now after you have  your brass fire formed before you do anything else you need to take the little aluminum adapter that came with your die and mount that on your caliper zero your caliper and measure the fired cases record your data.( Another good thing to do right now is get your fired case capacities by putting your case on a scale zeroing fill with water and weigh it, i do this to 10 cases and take the average and jot it down for reference. When you get new brass you check it the same way to make sure the capacities are close and so you can adjust your loads accordingly.) You can also use the Hornady headspace kit for this it has adapters to work with most rifle cartridges.

This is your fire form shoulder position and unless they were full power loads may not be fully formed. i normally take the top 3 charges from each combo and measure them they will be the most formed. When starting out you can measure them all so you can see as the charges go up so does the measurement till it stops that is when they are fully formed. So now you have your fired cases, your measurement, so now it is time to set up the die. You are looking for .003-.004 bump on the shoulder you can start at .002 and see if they chamber and extract but the chamber is a tight one and normally i have to ru_n around .004 on my AR's. 

To set up the die put it in your press Screw the die down to the shell holder and back off 1/4 turn. Lube your case, measure the shoulder again, and run through die. Measure again start turning the die a little at a time till the measurement is .003 under the first measurement. now i like to go ahead and seat a bullet and check to see if it chambers and extracts correctly. If not pull the bullet bump another .001 and try again. Now that you have the die set the hard part is done. I like to repeat this after 3-4 fires just to double check by then the cases will be fully formed to the chamber.

I do this for every rifle I own it keeps you from over sizing the brass which can lead to case head separation, false pressure signs, accuracy issues and the list goes on.

Now loading the rounds is just like any other round.
  • Clean brass
  • lube and size brass
  • trim brass
  • chamfer/debur
  • clean off lube
  • prime
  • charge with powder
  • seat bullet
  • shoot and repeat
just double check the head space measurements once in a while to make sure you are still where you need to be.

Those wanting to get the most out of their rifles will also check distance to  lands with the bullets they plan to shoot to know where max oal is and set distance to lands when seating. A bullet comparator set is another tool that every reloader should have. it is more accurate way to measure your loaded rounds and get them consistent.

here are a few more tools any wildcat reloader should have and most rifle loaders should too

Hornady oal tool

Hornady bullet comparator

I will make the 7mm Valkyrie oal modified cases for the hornady oal tool for you if you would like one, they are $10 shipped. just email me
​
Thanks for reading load safe and have fun shooting

Bruce Finnegan
4 Comments

Bullet Selection

11/17/2015

8 Comments

 
Picture
Picture
By Uriah Walker

​In this week’s blog I’m going to hack up the idea of bullet selection, so bear with me.
I know, this topic is like opening Pandora’s Box. At the bottom of that box is one conclusive commonality – accurately putting rounds on target, paper or pump station.
 
As can be seen in our pet load chart, there are several bullet choices that seem to shoot very well out of the 7mm Valkyrie AR with various barrel lengths. Everything from the 120gr Barnes TTSX to the 168gr Berger VLD Hunting, so, which one should you choose?
 
That choice isn’t really any easier than selecting a caliber or rifle, Remington, Ruger, Winchester or Wetherby. Lucky for you, it’s a good thing you’ve already made that decision in the AR-15 platform and the Valkyrie. Now, why choose one bullet over another?
 
Let’s start by considering what will be catching your bullet.
 
Shooting into an inanimate backstop with no requirement for rapid fire leans towards a longer bullet with a higher BC to achieve bug holes at extended ranges. This choice should be an easier one with limited options of Berger, Nosler and a few other boutique brands.
 
Choosing one for taking game involves some additional consideration. The most significant factors, for me, are expected ranges and quarry. These two factors play into the most important, first choice – bullet weight.
 
Even if you have the most accurate load that never misses (so long as you do your part) it is not ethically effective if it does not retain enough energy to cause terminal damage at your expected ranges. Bottom line, fast and flat isn’t always the best choice. An elk or deer isn’t exactly a prairie dog.
 
With that being said, by using various ballistics software, it’s possible to at least choose a range of bullet weights that will deliver energy on your target at range. Now that you’ve narrowed down the herd you can work up a load from those bullets in the weight range selected.
 
Sounds simple, right? Sometimes having too many choices, as can be the case with this caliber since it shoots so many of them well, isn’t necessarily a bad thing. Pick a few that are available to you, and a couple of powders (more on that later) and start shooting.


Comments

John Hull writes:

One of the things that makes 7mm so effective is the balance between bullet diameter, bullet length, and sectional density when compared to similar calibers like 6.5 and .30. When you're working with a finite magazine length, bullet length in relation to weight is a huge factor because that impacts on powder capacity in the case.


6.5 and smaller diameter calibers have long bullets in relation to their weight, making it hard to find powders that have enough load density to achieve good velocity with medium game suitable bullets. .30 caliber has density problems at typical game bullet weights in AR length rounds. You can't get enough powder in the case to get good velocity due to the heavy weight.

In 7mm you have sufficient diameter to get good weight without excessive bullet length, eliminating 6.5 and smaller for medium and large game. In turn, those weights have good sectional density, so you get good ranging and penetration with less recoil compared to an equivalent .30 caliber bullet.

A 140 gr. 7mm is heavier than any of the smaller caliber rounds, but still light enough to achieve high velocity, and is about equal to a 165 gr. in .30 cal. A 160 gr. 7mm in the 7 VAR, 7mm-08, 7x57, etc. gives energy and penetration that you need to go to 190 gr. in .30 cal. to achieve. 

So, 7mm sits firmly astride the middle ground and is good at both ends of the spectrum. That's why so many of the bullets available in 7mm do so well, and it isn't hard to get good results by just matching the bullet weight to the intended use. For the Valkyrie the best all around choice is one of the 140 gr. class of bullet. Find the one your rifle likes best and you're good to go.
8 Comments

Wildcat’s:  How to set shoulder bump

11/12/2015

8 Comments

 
Picture
Picture
Today I will be talking about how to set up your die to size your wildcat rounds or any round for that matter. I will be discussing the tools that make it easier to do the job and some of the terminology.

First let’s start off with what is meant by shoulder bump? Shoulder bump is the amount – distance you push the shoulder back when sizing so it fits the chamber. You want as little bump as you can get away with for accuracy and brass life but enough so the rounds chamber reliably. Semi-auto rifles take a little more bump than bolt guns do. In bolt guns if brass is only fired in one gun you need very little as in < .001 bump. But autoloaders take normally .002-.004 shoulder bump or set back as it is called sometimes.

Tools needed Micrometer of some sort digital or analog, Head space adapter set like the Hornady head space kit HK66 http://www.midwayusa.com/product/479704/hornady-lock-n-load-headspace-gage-5-bushing-set-with-comparator
  You pick the correct comparator body for the round you are measuring it should come close to the center portion of the shoulder.

Wildcats differ because there are no SAAMI or generally accepted published specifications for the round, so to get the proper shoulder bump you first need to see how far your newly formed brass has to have the shoulder set back to chamber in your particular rifle.
 
To get started, take your new brass and form it in your die initially with the die screwed all the way to the shell holder and then backed off ½ turn off shell holder  Run the case through the die and measure the shoulder position.  You accomplish this by using the Hornady headspace kit which attaches to your calipers in order to take a measurement.
 
Some wildcats come with a starting spec for the shoulder.  If not, finish all the other prep work required for that piece of brass and try to chamber it.  If the bolt won’t close or it sticks in the chamber you need to adjust your die down a bit and resize.  I would do this in 1/16th turn increments until it chambers reliably without fail.
 
Next, measure the shoulder position again and back the die off 1/16th turn.  Size a new case and try to chamber it.  If needed, adjust the die down slightly until it does and form a new case again to test.  If this round chambers reliably and without effort or sticking, measure the shoulder position.  With this done you have established your new brass shoulder position or your baseline. 
 
Now make up some cases and make sure they chamber.  Load them with a safe starting load, obviously nothing near maximum, and fire them.  Some low-powered starting loads may not fully shape your new cases to the chamber, so at this stage I usually run a “pressure ladder” where I have prepared progressively hotter charges in .3 grain increments up to where max should be for the bullet and powder being used.
 
When firing this test ladder, I watch for pressure signs on the case head, neck (for sealing), and primer.  Obviously you will stop working up the ladder if you start to see signs of maximum pressure.  I usually do 7 to 10 round ladders loading one round of each charge.
 
When done I measure and record all of the shoulder positions.  What you will see is where they quit growing, and that will be your fire-formed shoulder position.  Important: Save that in your notes.
 
Now you are ready to resize the brass.  Once again back off the die a quarter turn, resize, measure the shoulder, and then run through the die again until you have the shoulder bump that you want.  You are looking for .002 or less vs. what you recorded for the fired round.  Adjust die down until you get that.  Once you have it, try and test chamber your sized brass also checking for smooth extraction.  If it isn’t smooth go back and bump the shoulder back another .001 and repeat this until your resized brass chambers and extracts perfectly.
 
As I stated above, normally with auto loaders .003 is what I’m looking for, but some rifles with tight chambers will take .004 or .005.
 
Something to bear in mind since we’re not necessarily running the die all the way down onto the ram in your press is that you may or may not be caming over on the press when you get the correct shoulder bump.  This is normal if so.
 
Also, the type of lube you use and how much is on the case will affect the shoulder bump, so consistent and good practices there are important. I only use enough lube to keep the cases from sticking and try to keep it off the shoulder area.


8 Comments
<<Previous
Forward>>

    Author
    multiple 

    This blog will be a collection submitted by 7VAR Founders, Testers and End users

    Archives

    December 2017
    November 2017
    January 2016
    December 2015
    November 2015
    October 2015
    August 2015
    July 2015
    June 2015
    May 2015

    Categories

    All

    RSS Feed

Proudly powered by Weebly